一、环境准备
1、下载Hue:https://dl.dropboxusercontent.com/u/730827/hue/releases/3.12.0/hue-3.12.0.tgz
2、安装依赖
yum groupinstall -y "Development Tools" "Development Libraries"
yum install -y apache-maven ant asciidoc cyrus-sasl-devel cyrus-sasl-gssapi gcc gcc-c++ krb5-devel libxml2-devel libxslt-devel make mysql mysql-devel openldap-devel python-devel sqlite-devel gmp-devel libffi-devel
二、MySQL配置
1、    为root用户设置密码;
2、    配置远程登录
3、    创建hue数据库
4、    flush hosts
5、    flush privileges
三、解压、编译并安装
tar -zxvf hue-3.12.0.tgz -C /opt
cd /opt/ hue-3.12.0
make apps
四、集成环境配置
1、配置HDFS
vim /opt/hadoop-2.7.3/etc/hadoop/hdfs-site.xml

<property>
     <name>dfs.webhdfs.enabled</name>
     <value>true</value>
</property>

<property>
     <name>dfs.permissions.enabled</name>
     <value>false</value>
</property>
2、配置core-site.xml
vim /opt/hadoop-2.7.3/etc/hadoop/core-site.xml
<property>
     <name>hadoop.proxyuser.hue.hosts</name>
      <value>*</value>
</property>

<property>
      <name>hadoop.proxyuser.hue.groups</name>
      <value>*</value>
</property>

<property>
       <name>hadoop.proxyuser.root.hosts</name>
       <value>*</value>
 </property>

  <property>
       <name>hadoop.proxyuser.root.groups</name>
        <value>*</value>
 </property>
3、配置yarn-site.xml
vim /opt/hadoop-2.7.3/etc/hadoop/yarn-site.xml
<!--打开HDFS上日志记录功能-->
<property>
    <name>yarn.log-aggregation-enable</name>
    <value>true</value>
</property>

<!--在HDFS上聚合的日志最长保留多少秒。3天-->
<property>
     <name>yarn.log-aggregation.retain-seconds</name>
     <value>259200</value>
</property>
4、配置httpfs-site.xml
vim /opt/hadoop-2.7.3/etc/hadoop/httpfs-site.xml
<property>
    <name>httpfs.proxyuser.hue.hosts</name>
    <value>*</value>
</property>

<property>
    <name>httpfs.proxyuser.hue.groups</name>
    <value>*</value>
</property>
5、配置文件同步
将以上配置文件同步到其他Hadoop主机
添加hue用户及用户组
sudo useradd hue
sudo chmod -R 755 /opt/hue-3.12.0/
sudo chown -R hue:hue /opt/hue-3.12.0/
五、Hue的配置
vim /opt/hue-3.8.1/desktop/conf/hue.ini
1、配置HDFS超级用户
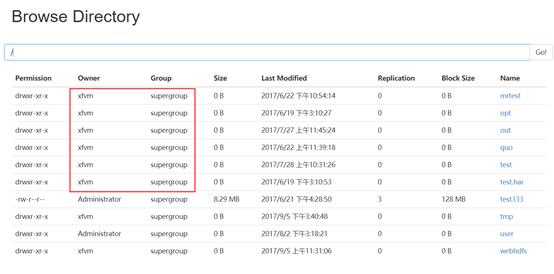
 # This should be the hadoop cluster admin
  default_hdfs_superuser=xfvm
超级用户参见HDFS WEBUI
2、配置desktop
[desktop]

  # Set this to a random string, the longer the better.
  # This is used for secure hashing in the session store.
  secret_key=jFE93j;2[290-eiw.KEiwN2s3['d;/.q[eIW^y#e=+Iei*@Mn<qW5o
  # Webserver listens on this address and port
  http_host=xfvm04
  http_port=8888

  # Time zone name
  time_zone=Asia/Shanghai
3、配置HDFS
 [[hdfs_clusters]]
    # HA support by using HttpFs

    [[[default]]]
      # Enter the filesystem uri
      fs_defaultfs=hdfs://xfvm01:8020

      # NameNode logical name.
      ## logical_name=

      # Use WebHdfs/HttpFs as the communication mechanism.
      # Domain should be the NameNode or HttpFs host.
      # Default port is 14000 for HttpFs.
      webhdfs_url=http://xfvm01:50070/webhdfs/v1
4、配置YARN
   [[[default]]]
      # Enter the host on which you are running the ResourceManager
      resourcemanager_host=xfvm01

      # The port where the ResourceManager IPC listens on
      resourcemanager_port=8132
      #参考yarn-site.xml中的yarn.resourcemanager.address.rm1
      # Whether to submit jobs to this cluster
      submit_to=True

      # Resource Manager logical name (required for HA)
      ## logical_name=

      # Change this if your YARN cluster is Kerberos-secured
      ## security_enabled=false

      # URL of the ResourceManager API
      resourcemanager_api_url=http://xfvm01:8188
#参考yarn-site.xml中的yarn.resourcemanager.webapp.address.rm1
      # URL of the ProxyServer API
      proxy_api_url=http://xfvm01:8130
      #参考yarn-site.xml中的yarn.resourcemanager.scheduler.address.rm1
      #端口固定:8088
      # URL of the HistoryServer API
      #参考mapred-site.xml中的mapreduce.jobhistory.webapp.address
      history_server_api_url=http://xfvm03:19888
5、配置HIVE
[beeswax]

  # Host where HiveServer2 is running.
  # If Kerberos security is enabled, use fully-qualified domain name (FQDN).
  hive_server_host=xfvm04

  # Port where HiveServer2 Thrift server runs on.
  hive_server_port=10000
6、配置zookeeper
[zookeeper]

  [[clusters]]

    [[[default]]]
      # Zookeeper ensemble. Comma separated list of Host/Port.
      # e.g. localhost:2181,localhost:2182,localhost:2183
      host_ports=xfvm02:2181,xfvm03:2181,xfvm04:2181
7、配置MySQL
 # mysql, oracle, or postgresql configuration.
    ## [[[mysql]]]
      # Name to show in the UI.
      nice_name="My SQL DB"

      # For MySQL and PostgreSQL, name is the name of the database.
      # For Oracle, Name is instance of the Oracle server. For express edition
      # this is 'xe' by default.
      name=mysqldb

      # Database backend to use. This can be:
      # 1. mysql
      # 2. postgresql
      # 3. oracle
      engine=mysql

      # IP or hostname of the database to connect to.
      host=xfvm04

      # Port the database server is listening to. Defaults are:
      # 1. MySQL: 3306
      # 2. PostgreSQL: 5432
      # 3. Oracle Express Edition: 1521
      port=3306

      # Username to authenticate with when connecting to the database.
      user=root

      # Password matching the username to authenticate with when
      # connecting to the database.
      password=123456
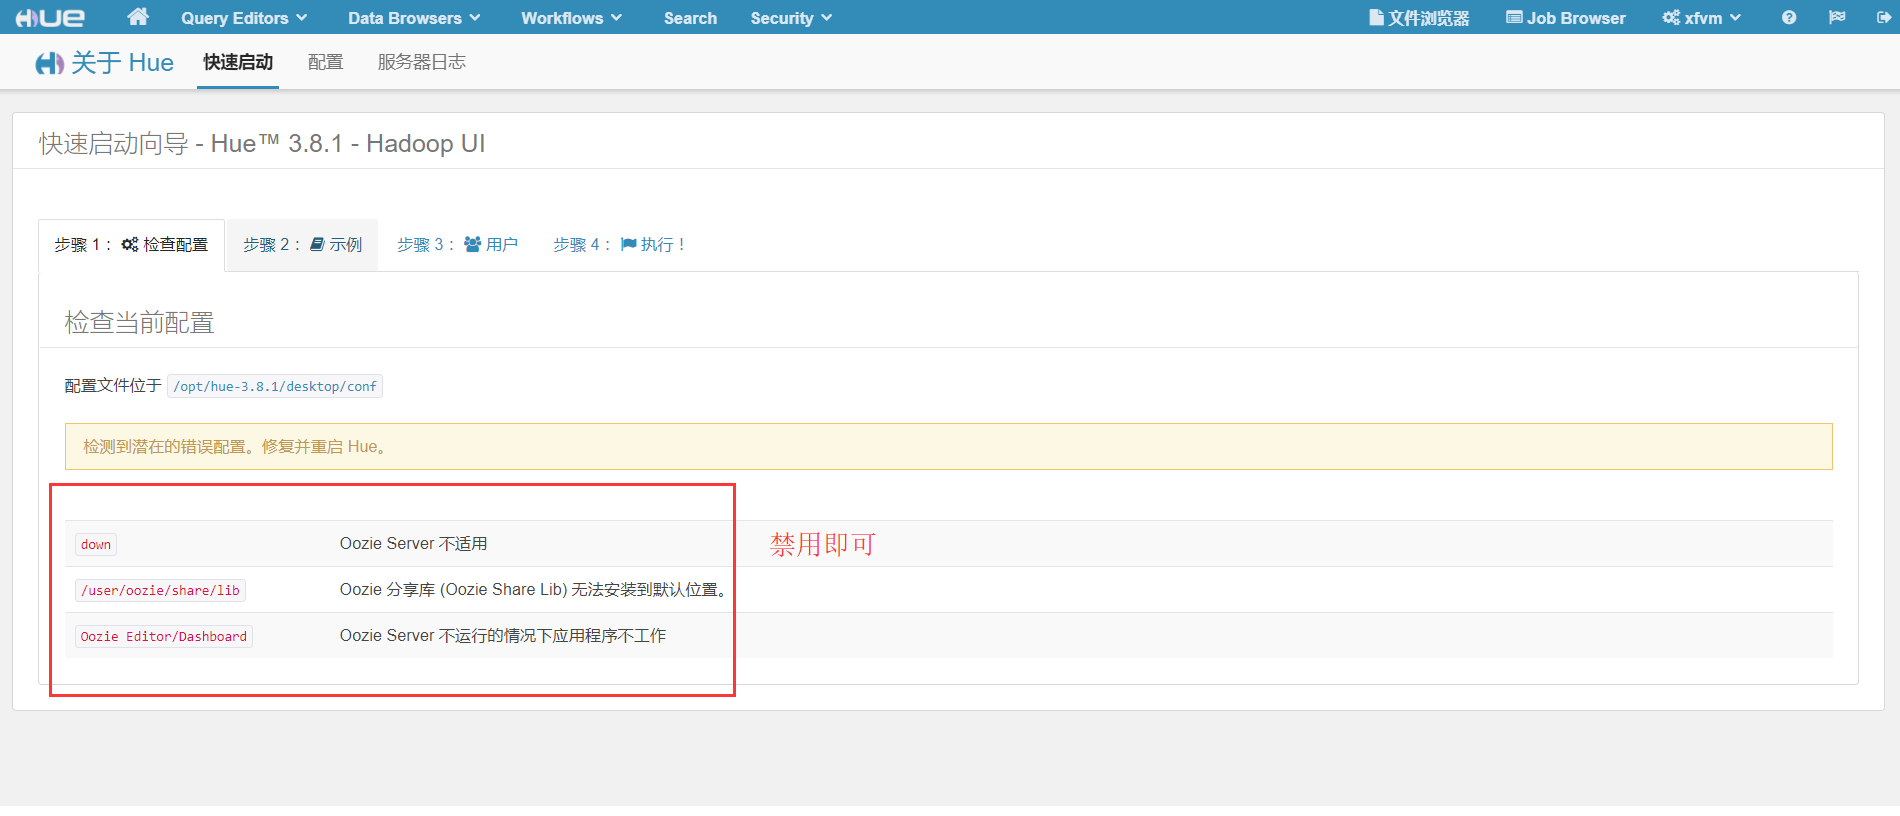
8、配置禁用组件(还未安装的组件)
# Comma separated list of apps to not load at server startup.
  # e.g.: pig,zookeeper
  app_blacklist=pig,hbase,spark,impala,oozie
六、Hive环境变量的配置(hiveserver2,使用Mysql作为独立的元数据库)
1、编辑hive-site.xml
<property>
    <name>hive.metastore.uris</name>
    <value>thrift://192.168.10.24:9083</value>
    <description>Thrift URI for the remote metastore. Used by metastore client to connect to remote metastore.</description>
  </property>

  <property>
    <name>hive.server2.thrift.bind.host</name>
    <value>192.168.10.24</value>
    <description>Bind host on which to run the HiveServer2 Thrift service.</description>
  </property>
七、MySQL初始化
进入hue安装目录的/bin目录
./hue syncdb
./hue migrate
八、启动顺序
1、启动Hive metastore
$ bin/hive --service metastore &
2、启动hiveserver2
$ bin/hive --service hiveserver2 &
3、启动Hue
$bin/supervisor
4、浏览器:http://xfvm04:8888,输入用户名和密码即可登录
转自:https://www.cnblogs.com/MrFee/p/hue_hive1.html